Save to Pinterest
 My cousin brought these to a potluck last summer, and I watched them disappear faster than the ice cream melted on the back porch. She wouldn't share the recipe at first, but after enough begging and a promise to make her lasagna, she finally texted it to me at midnight. The combination of chocolate cookies, creamy cheesecake, and actual peanut butter cups baked right in felt almost too indulgent to be real, yet there it was, sitting on her kitchen counter like some kind of dessert miracle. Now whenever I make a batch, I understand why she'd been so protective of it.
I made these for my best friend's birthday party and watched her take one bite, close her eyes, and just sit there for a moment in pure joy. Her mom asked for the recipe before people had even finished eating, and I knew right then these weren't just good desserts, they were the kind of bars that make people remember the party for the right reasons.
Ingredients
- Chocolate cookie crumbs (1 1/2 cups): Crush your Oreos with the cream removed so the crust doesn't become a soggy disaster, though honestly, a few cream bits won't ruin anything if you're impatient like me.
- Unsalted butter, melted (1/4 cup): This binds everything together into a proper crust that won't crumble when you slice, the small gesture that makes all the difference.
- Granulated sugar (2 tbsp for crust, 2/3 cup for filling): A little sweetness in the crust balances the cookies, while the larger amount in the filling keeps everything silky and smooth.
- Cream cheese, softened (16 oz): Room temperature is non-negotiable here, or you'll end up with lumps that no amount of beating fixes.
- Eggs, room temperature (2 large): Cold eggs don't incorporate smoothly, and the whole filling suffers for it.
- Sour cream (1/2 cup): This adds a subtle tang that keeps the cheesecake from tasting one-note sweet, a secret weapon that hardly anyone notices but everyone feels.
- Creamy peanut butter (1/2 cup plus 2 tbsp for drizzling): The smooth kind works best here; chunky peanut butter can sometimes act unpredictably in baking.
- Vanilla extract (1 tsp): Just enough to round out the flavors without making anyone ask what that taste is.
- Mini peanut butter cups, roughly chopped (1 1/2 cups): Chop them yourself rather than buying pre-chopped so you control the size and they don't turn to dust.
- Semisweet chocolate chips (1/2 cup, optional): For garnish if you want extra chocolate appeal, which honestly, who wouldn't.
Tired of Takeout? 🥡
Get 10 meals you can make faster than delivery arrives. Seriously.
One email. No spam. Unsubscribe anytime.
Instructions
- Prep your pan like you mean it:
- Preheat your oven to 350°F and line a 9x9-inch pan with parchment paper, letting it overhang so you can lift the whole thing out later without wrestling. This single step saves you from a sad, crumbly mess when it's time to cut and serve.
- Build the crust foundation:
- Mix your crushed cookies, melted butter, and sugar until it looks like wet sand, then press it firmly into the pan and bake for 8 minutes. You want it set but not hard, just a solid base that won't shift when you pour the filling on top.
- Whip the cream cheese into submission:
- Beat your softened cream cheese and sugar together until it's completely smooth and creamy, scraping the bowl halfway through because lumps will haunt you. This takes about 2 to 3 minutes of steady beating, and it's the foundation of everything that makes this dessert work.
- Add eggs with care:
- Add one egg at a time, beating just until combined after each one, then mix in the sour cream, peanut butter, and vanilla until uniform and silky. Overmixing at this point can add too much air and cause cracks on top, which aren't the end of the world but aren't ideal either.
- Fold in the first batch of peanut butter cups:
- Gently fold 1 cup of the chopped mini cups into the filling so they're distributed throughout, then pour everything over your cooled crust. This creates those pockets of chocolate and peanut flavor baked right into the cheesecake.
- Top with remaining cups:
- Sprinkle the last 1/2 cup of chopped peanut butter cups over the filling surface so they bake slightly into the top layer. This gives you those little bursts of texture and flavor in every bite.
- Bake until just set:
- Bake for 25 to 28 minutes until the center is just set with a barely-there jiggle when you gently shake the pan. Overbaking leads to cracks, so trust your instincts and pull it out when the edges are just barely firm.
- Cool and chill with patience:
- Let it cool completely at room temperature first, then refrigerate for at least 2 hours until it's properly firm and cold. This resting time is when the flavors settle and the texture becomes what you dream about.
- Finish and serve:
- Before cutting, drizzle with melted peanut butter and add chocolate chips if you're feeling fancy, then slice into 16 bars with a sharp knife dipped in hot water between cuts. The cold, rich slices are meant for eating straight from the fridge, maybe with a glass of cold milk nearby.
 Save to Pinterest
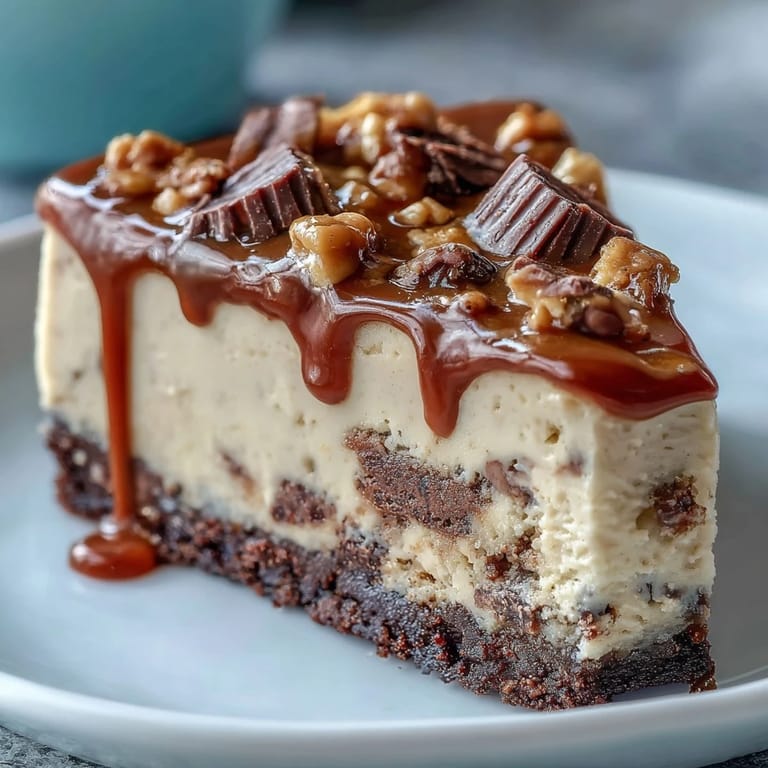
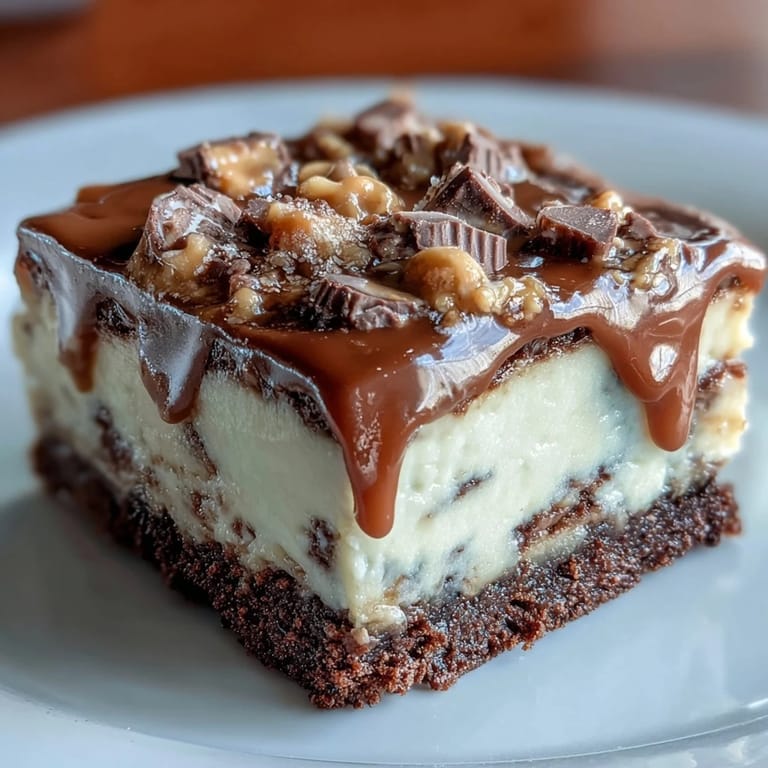
 There's something special about pulling these bars out of the fridge and watching someone's face light up at that first bite, the chocolate cookie crust giving way to dense cheesecake studded with actual peanut butter cups. It's the kind of dessert that makes you feel like you've done something impressive, even though the process is honestly pretty straightforward.
Storage and Make-Ahead Tips
These bars keep beautifully in an airtight container in the fridge for up to 5 days, which means you can make them the day before a party and actually enjoy your guests instead of stressing in the kitchen. I've found they taste even better on day two when all the flavors have had time to get to know each other, so don't hesitate to prep ahead.
Customization Ideas
If you want a crunchier texture in the crust, add 1/4 cup of finely chopped roasted peanuts to the cookie mixture, which gives you a nice textural contrast. For a nut-free version, swap the peanut butter for almond butter and use regular chocolate bars chopped up instead of peanut butter cups, though I'll admit it's not quite the same magic.
Pairing and Serving Suggestions
These bars pair beautifully with cold milk, which cuts through the richness and makes you want just one more slice. A light-bodied coffee or even hot chocolate works wonderfully too, transforming this dessert from an end-of-meal treat into a proper moment worth savoring.
- Serve them straight from the fridge so they stay firm and the flavors shine at their best.
- A sharp knife dipped in hot water between cuts makes slicing cleaner and way less frustrating.
- These make incredible gifts wrapped individually in parchment, if you can resist eating them all first.
 Save to Pinterest
 These peanut butter cup cheesecake bars have a way of becoming the dessert people specifically ask you to make, the one that gets requests before the last batch is even finished. That's when you know you've created something worth keeping in your regular rotation.
Recipe FAQs
- → What is the best way to achieve a firm crust?
Press the chocolate cookie crumbs mixture firmly into the pan and bake for 8 minutes before adding the filling to help it set properly.
- → Can I substitute almond butter for peanut butter?
Yes, almond butter can be used as a substitute, keeping in mind any specific allergies among guests.
- → How long should the bars chill before serving?
Chill the bars for at least 2 hours to ensure the filling firms up and slices cleanly.
- → Are the chocolate chips necessary for garnish?
Chocolate chips are optional but add a nice touch of texture and extra chocolate flavor when sprinkled on top.
- → Can the crust be made crunchier?
Adding finely chopped roasted peanuts to the crust mixture will add extra crunch and enhance the nutty flavor.