 Save to Pinterest
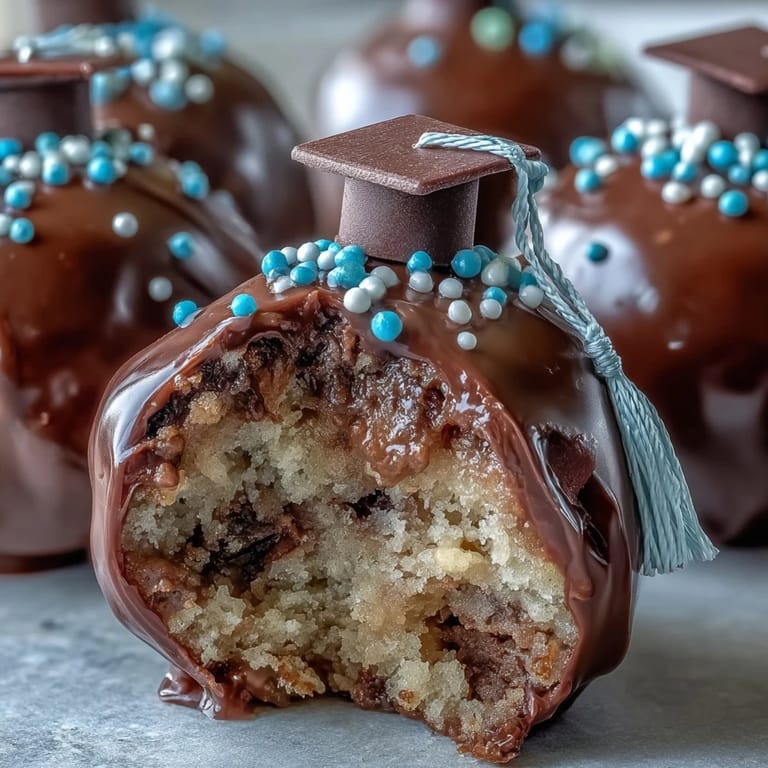
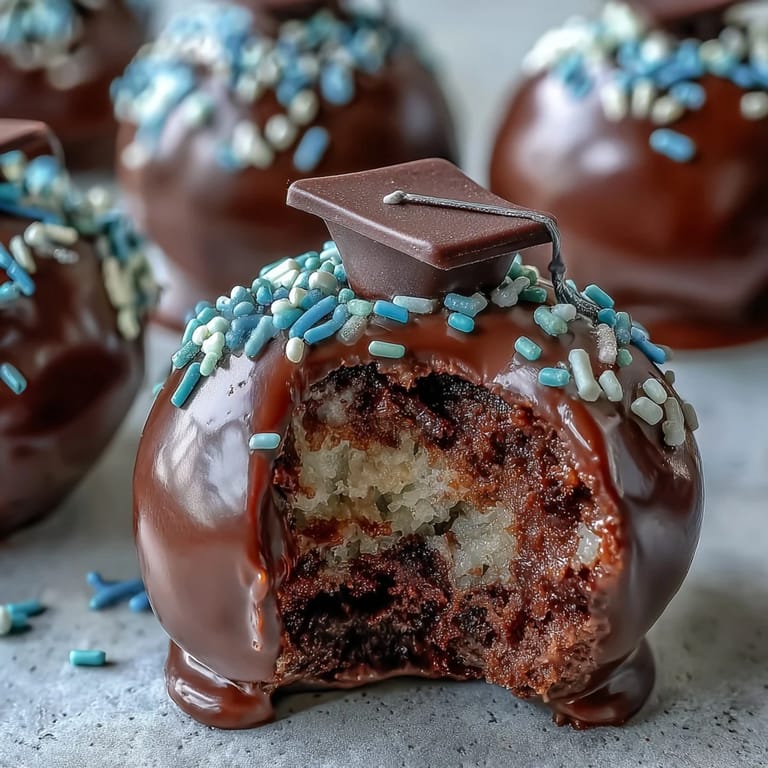
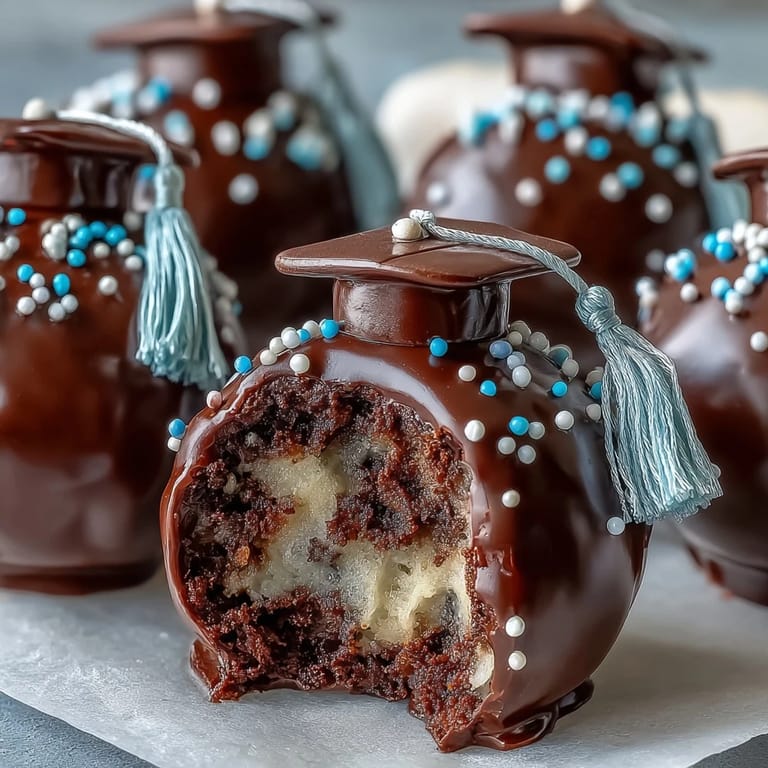
 The scent of cake baking always brings a quiet energy to my kitchen, but these graduation cake pops turned it into a celebration all their own. I first made them on a whim, using leftover cake after a friend's end-of-school-year dinner, and it quickly spiraled into a tradition. Melting colorful candy coatings while humming the school anthem, I found myself grinning at how a simple pop could capture so much spirit. Each decorating session became a mini craft project, and I realized I was making edible confetti as much as dessert. Sprinkles flew, chocolate smudged—somehow, everything looked perfectly festive by the end.
I’ll never forget how laughter echoed as we tried to recreate school logos from fondant and made more mess than sense. My younger cousin declared hers was a dinosaur in a cap, and we let her roll with it—graduation pride comes in all shapes, after all.
Ingredients
- Vanilla or chocolate cake mix (or homemade cake): You can choose classic vanilla or chocolate, but the key is that the cake is completely cooled before crumbling—otherwise, the pops get mushy.
- Cream cheese or buttercream frosting: Not too much or the pops won’t hold their shape; start with less and add more only as needed.
- Candy melts in school colors: Candy melts are the easiest for coating, and I’ve found using two shades makes everything pop. If you’re using white chocolate, add color very gradually.
- Vegetable shortening: If the melted chocolate is too thick or stubborn, a spoonful of shortening blends right in and gives a perfect dipping texture.
- Sprinkles, edible glitter, or colored sugar: A sprinkle shower right after dipping looks impressive even if your hands are shaky.
- Lollipop sticks: These transform humble cake into a portable party—slightly thicker sticks work better for heavier pops.
- Mini chocolate chips: They make adorable ‘tassels’ when paired with tiny fondant squares, but they also double as accents if you improvise.
- Fondant in school colors (optional): Rolling and cutting fondant squares for the cap gives everything a true graduation vibe, but it’s easy to skip if you want simple sparkle only.
Tired of Takeout? 🥡
Get 10 meals you can make faster than delivery arrives. Seriously.
One email. No spam. Unsubscribe anytime.
Instructions
- Bake and Cool the Cake:
- Let’s start by baking your cake as directed. The house fills with a comforting aroma—resist nibbling until it’s fully cooled or the crumbs will clump too soon.
- Crumble into Fine Pieces:
- Break up the cooled cake with your fingers until no big pieces remain. I always catch myself sampling the crisp bits (strictly for quality control, of course).
- Mix in Frosting:
- Add small spoonfuls of frosting, mixing gently with a spatula or just your hands, until it presses together like play-dough. You can always add more — but never less, so go slow.
- Shape Cake Balls:
- Roll tablespoon-sized scoops into 24 even balls. Wetting your hands slightly helps keep things smooth—my first round looked like lumpy planets, but they still tasted divine.
- Chill for Firmness:
- Set the cake balls on a lined sheet and transfer to the freezer for 20 minutes (or fridge for an hour). This step is your friend for smooth dipping later.
- Melt the Coating:
- In a microwave-safe bowl, gently melt your candy melts or chocolate in 30-second bursts. Stir until glossy, adding shortening if it feels too thick—it should flow off a spoon like silk.
- Prep the Sticks:
- Dip each lollipop stick’s tip into melted chocolate, then insert halfway into a cake ball. This sticky trick glues the pop in place so it won’t tumble off.
- Dip and Decorate:
- Fully dip each pop, gently spinning as you lift to catch any drips. While the coating is wet, rain on the sprinkles, colored sugar, or edible glitter; trust me, there’s no such thing as too much.
- Fashion Graduation Accents:
- To make cap decorations, press a small fondant square atop the cake pop and dot a mini chip for the tassel with a touch of melted chocolate. This part turns every pop into a little graduate.
- Let Set Completely:
- Plant each pop upright in a styrofoam block or cake pop stand and let it set until the shell is crisp. Once dry, they’re ready for the proudest dessert table in town.
 Save to Pinterest
 Watching everyone choose their favorite decorated pop felt like the start of a graduation speech—every bite was a little cheer for what came next. Somehow, a small cake on a stick became a toast to new beginnings and inside jokes.
Getting Your Candy Melt Texture Just Right
It can be a surprise how stubborn candy melts can be. When it’s too thick, the cake balls plunge right off the stick or the coating stays lumpy. If this happens, stir in vegetable shortening bit by bit. The shift to a silky dip is almost instant, and suddenly, each pop turns out perfectly smooth and glossy.
Creative Decoration Tips
Splitting up the decoration process among friends always sparks creativity—some go for neat and tidy, others pile on the sprinkles. I’ve found edible markers are a secret weapon for doodling years, initials, or even tiny smiley faces on the pops. Fondant caps may take a couple tries for clean edges but end up looking so celebratory, especially in combination with a dash of glitter.
Make-Ahead and Storage Advice
If you prep a day in advance, these pops are even easier to share. The flavors soak in, the edges crisp up, and you get more time to practice your sprinkle technique—which has yet to fail at bringing out everyone’s inner artist.
- Let the coated pops fully harden before packing.
- Store them upright so designs stay pristine.
- Handle gently: decorations like fondant and sprinkle clusters can be fragile.
 Save to Pinterest
 Here’s to every little milestone and the pops that make them sweeter. Happy graduation—your dessert table will be the talk of the party.
Recipe FAQs
- → How do I customize cake pops to match school colors?
Use colored candy melts, food coloring in white chocolate, or school-colored sprinkles and fondant for decoration.
- → Can I make cake pops ahead of time?
Yes, store them in an airtight container at room temperature for up to 3 days, or refrigerate for up to a week.
- → What type of cake can be used?
Use a boxed cake mix or a homemade cake, in flavors like vanilla or chocolate, fully cooled before crumbling.
- → How do I prevent the coating from cracking?
Make sure the cake balls aren’t too cold before dipping, and gently tap off excess coating for a smooth finish.
- → What decorations work best for graduation?
Try fondant squares for caps, mini chocolate chips for tassels, and edible glitter or markers for extra details.
- → Is there a gluten-free option?
Yes, use gluten-free cake mix and verify all other ingredients are gluten-free to accommodate dietary needs.