 Save to Pinterest
 Every now and then, a recipe surprises you with how ridiculously fun it is to make. Long before my first Derby party, the aroma of sharp cheddar melting into buttery dough—paired with the briny pop of green olives—became a signal that something playful was about to hit the table. The act of wrapping each olive in its cheesy coat is oddly satisfying, like stuffing little savory gifts. Somewhere between rolling the dough and skewering the golden balls, it always feels more like assembling party favors than prepping food.
One spring I made these for a crowd that drifted in for Derby Day, hats askew, cocktails in hand. Friends crowded in the kitchen, taking turns threading cheese balls onto skewers while I tried to keep a straight face every time a runaway olive landed on the floor. Everyone hovered, lured by the scent in the oven, and nobody minded that we ‘sampled’ half the batch before guests arrived.
Ingredients
- All-purpose flour: Go for unbleached if you can—the dough holds together with a slightly sturdier bite.
- Sharp cheddar cheese, shredded: Hand-grated works best, never pre-shredded, for extra richness and easy melting.
- Unsalted butter, softened: Letting it soften fully is key for a smooth, pliable dough—skip the microwave if you can.
- Cayenne pepper (optional): Adds just a hint of warmth that sneaks up after the first bite—definitely worth a try if you dare.
- Smoked paprika: Smokiness balances the cheese and gives the dough a glowing color.
- Salt: I use a fine sea salt so it disappears right into the dough, not a coarse grind.
- Large green olives, pitted: The brinier, the better—Spanish Manzanilla are my preferred party olive.
- Appetizer-sized skewers or toothpicks: Definitely not optional—each bite is easier to snag for hungry hands.
Tired of Takeout? 🥡
Get 10 meals you can make faster than delivery arrives. Seriously.
One email. No spam. Unsubscribe anytime.
Instructions
- Prep your station:
- Fire up the oven to 400°F (200°C) and lay parchment on your sheet so nothing clings later.
- Mix the cheese dough:
- Dump flour, cheddar, softened butter, cayenne, paprika, and salt into a bowl and squish together with your hands until it all becomes a soft, shaggy dough.
- Shape and portion the dough:
- Pat the dough into a rectangle and cut into 24 pieces, each about the size of a generous tablespoon.
- Wrap the olives:
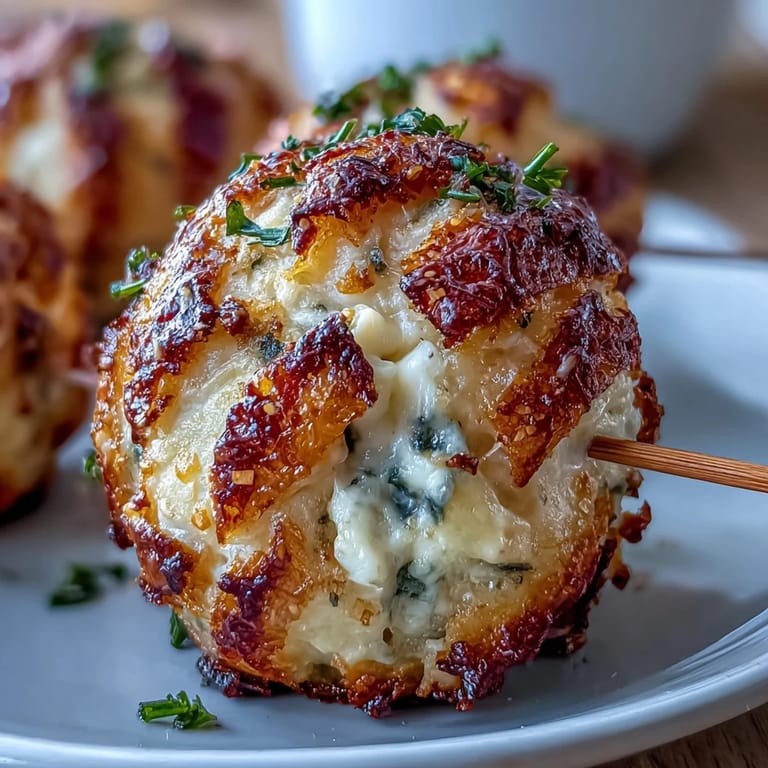
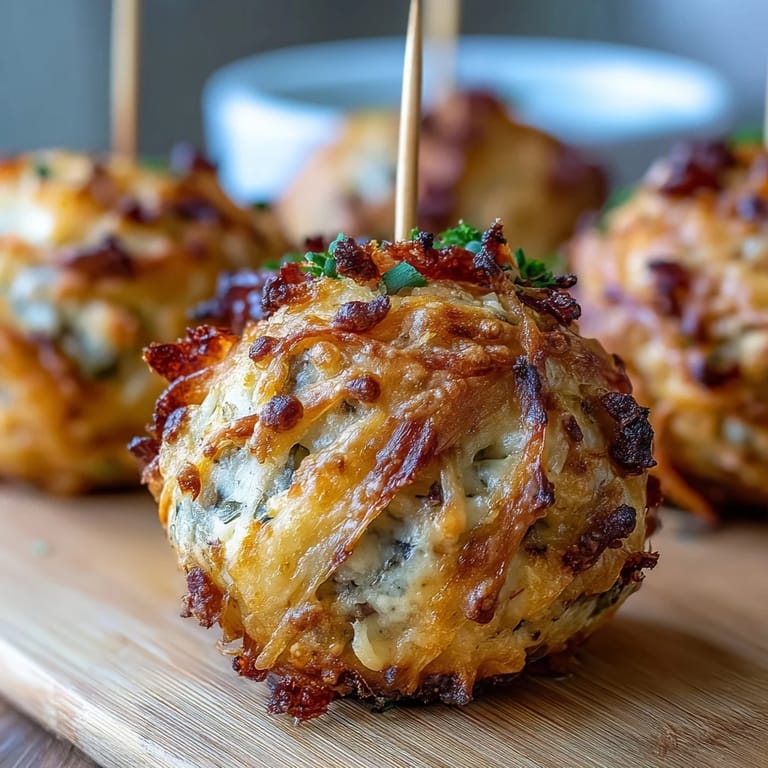
- Gently flatten each dough piece in your palm, set a green olive in the center, then fold the dough over and pinch the seams so the olive’s fully hidden—roll gently to make a smooth ball.
- Chill (optional) and bake:
- Space the balls on your tray and, for extra neatness, pop them in the fridge for 10 minutes. Slide into the oven and let bake for 16–18 minutes, until the tops are burnished golden and a cheesy waft fills the air.
- Skewer and serve:
- Wait 5 minutes, then spear each warm ball with a skewer or toothpick—serve them up right away or at room temperature.
 Save to Pinterest
 A few years ago, my sister and I assembled these for our annual potluck, giggling as we tried (and failed) to keep count of how many balls had actually made it onto the platter. That silly scatter of skewers in our kitchen felt like the real celebration, long before the guests started knocking.
How to Make Them Your Own
Half the fun is riffing on the filling. Sub in black olives for a mellow twist, or try jalapeño-stuffed olives if you want snackers to do a mild double-take after each bite. A sprinkle of everything bagel seasoning just before baking is another wild card worth trying.
Serving Suggestions That Never Fail
I love to set out a tiny dish of grainy mustard or, if you’re leaning into Derby charm, a bourbon honey dip alongside. They’re just as happy paired with a chilled cider or a Kentucky mule. You can tuck leftovers into a warm oven for a quick pick-me-up snack on lazy Sundays.
Essential Tips for Effortless Parties
Rolling all the dough balls before wrapping the olives speeds things up, especially with eager helpers nearby. The dough freezes beautifully, so you can stash extras for later and bake on a whim. Think of these as your party insurance: they’ll rescue any gathering from turning dull.
- Let skewered cheese balls cool slightly to help them set firmly on the stick.
- Try not to overcrowd the baking tray for even golden edges.
- Store leftovers in an airtight container and reheat until just warmed through for a revived cheesy bite.
 Save to Pinterest
 If you’re looking for a bit of Derby spirit without the race, these cheese balls deliver pure, snack-sized delight. They’re the kind of treat that turns any home into a party, sassy skewers and all.
Recipe FAQs
- → Can I use a different cheese?
Yes. Choose a good melting cheese with similar fat content—Gruyère, fontina or Monterey Jack work well. Adjust salt to taste if the cheese is salty.
- → How do I prevent the filling from leaking?
Use pitted olives and seal the dough completely around each olive, pinching seams tightly. Chilling assembled balls for 10–15 minutes firms the dough and reduces leaking while baking.
- → Can these be made ahead?
Yes. Prepare and assemble the balls, then store them covered in the fridge for up to 24 hours before baking. Baked leftovers reheat well in a warm oven to restore crispness.
- → Is freezing an option?
Freeze unbaked, assembled balls on a tray until solid, then transfer to an airtight container for up to 3 months. Bake from frozen, adding a few extra minutes to the time.
- → What dips or pairings work best?
Grainy mustard, bourbon-honey, spicy mayo or a tangy pickled relish complement the salty olives and cheddar. Serve with cold beer or bourbon-forward cocktails for a Derby-themed spread.
- → Any tips for dietary swaps or allergens?
For gluten-free, use a cup-for-cup gluten-free flour and confirm cheeses are free from cross-contact. Dairy-free versions need a melting vegan cheese and a butter substitute—expect a different texture.